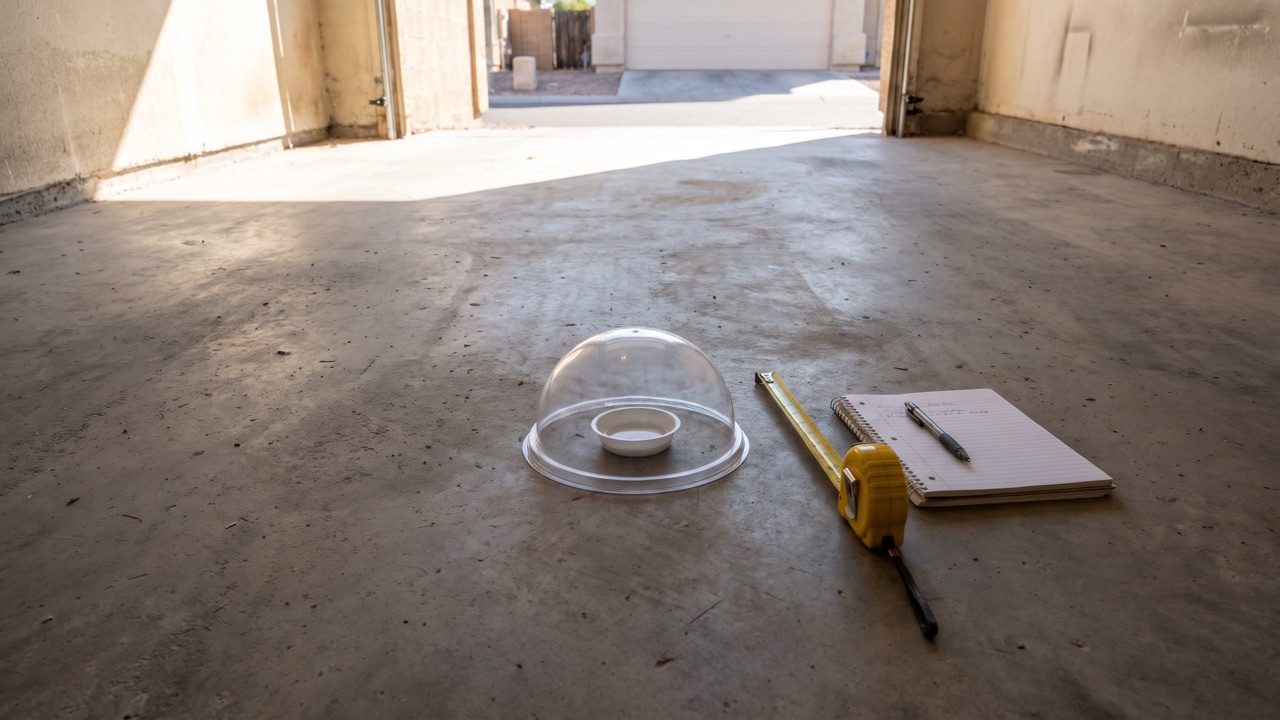
Concrete slab moisture testing is the step that decides whether an epoxy floor bonds for years or blisters off the slab within months. Water vapor moves up through concrete all the time, a coating seals the top of the slab, and any vapor that cannot escape pushes against the bond. Two ASTM methods measure that movement before anyone mixes a drop of resin. If you are planning a garage epoxy floor in Phoenix, this guide explains both tests, how to read the numbers and what happens when a slab fails.
Quick answer: Concrete slab moisture testing uses either ASTM F1869 (a calcium chloride dome that reports moisture vapor emission in pounds per 1,000 square feet per 24 hours) or ASTM F2170 (relative humidity probes set inside the slab). Compare the result with the limit printed on the coating data sheet. If the slab is over the limit, a moisture mitigation primer is normally added instead of cancelling the job.
| Method | What it measures | Result units | Test time |
|---|---|---|---|
| ASTM F1869 calcium chloride | Vapor leaving the surface | lb per 1,000 sq ft per 24 hours | 60 to 72 hours |
| ASTM F2170 relative humidity | Humidity inside the slab | Percent RH | At least 24 hours after probe placement |
The limits that apply to your floor come from the data sheet of the exact primer and coating on your quote, and they vary by product, so ask for it in writing.
1. Why Moisture Moves Through a Slab That Looks Completely Dry
A slab looks dry because liquid water is not visible on top, but concrete is porous and water vapor travels through it continuously. The driving force is the difference in humidity between the soil below the slab and the air above it, and vapor moves from wet to dry until the two balance.
A coating changes that balance. Bare concrete releases vapor into the air and no one notices. Once an epoxy film seals the surface, vapor arrives at the underside of the coating and has nowhere to go. It builds pressure, weakens the bond and lifts the film into blisters, or it carries salts that leave a white residue under the coating. Our guide to epoxy floor bubbling and peeling in Phoenix covers how that failure looks after the fact. This page covers how to prevent it with a test before the work begins.
A visual check proves nothing. A plastic sheet taped to the slab for a day (ASTM D4263) can flag a gross problem, but it gives no number, so it cannot tell you whether the slab is just under or just over a limit. That is the reason the industry uses quantitative tests, and ACI 302.2R, the guide for concrete slabs that receive moisture-sensitive flooring, points to both methods covered below.
2. ASTM F1869: The Calcium Chloride Test Explained
ASTM F1869 measures how much vapor leaves the surface of the slab over a set time. A technician weighs a dish of anhydrous calcium chloride, places it on the cleaned slab under a sealed plastic dome, leaves it for 60 to 72 hours and weighs it again. The weight gained is converted into a moisture vapor emission rate, or MVER, in pounds per 1,000 square feet per 24 hours.
The result is a snapshot of the top of the slab during the test window, so conditions matter. The standard expects the space to be at service conditions, and a garage that is hot with the door open for part of the test and sealed for the rest can give a result that does not represent normal use. The surface also has to be prepared as it will be for the coating, because a sealed or contaminated top layer can hide what is happening below.
Test count matters as much as the method. The standard calls for several kits on the first 1,000 square feet and additional kits as the area grows, which is why one dome on a large slab is not a valid result. Place tests near exterior walls, drains and any area that has been wet, because those are where moisture is most likely to show up. Surface preparation affects what the test reads, so tell the installer if the slab has been ground, shot-blasted or sealed before testing. Our page on concrete grinding and surface prep explains what that step does to a slab.
3. ASTM F2170: In-Situ Relative Humidity Probes
ASTM F2170 measures the humidity inside the slab instead of at its surface. A hole is drilled to a set depth, fitted with a sleeve, left to equilibrate and then read with a calibrated probe. The depth is a fraction of the slab thickness, which is deeper for a slab that dries from one side only, such as a slab on grade.
Because the probe sits within the concrete, it reads conditions that surface drying cannot disturb, so it is generally considered more representative, particularly on thick slabs. Many flooring and coating specifications now call for F2170 for that reason. Like the calcium chloride method, it needs the right number of test points, and the probes must be calibrated and the slab at service temperature for the reading to mean anything.
The tradeoffs are practical. Probes need drilled holes and a waiting period before reading, and the equipment costs more, so some contractors carry kits for one method and not the other. If your specification names a method, the quote should name it too.
4. Reading the Numbers and the Limits Coatings Publish
A moisture result means nothing alone, because every product publishes its own tolerance. Compare the reading from the slab with the maximum on the data sheet of the primer and coating system, in the same units.
Standard epoxy systems are the most sensitive. Their limits are typically low, in the range of a few pounds MVER or the mid 70 percent range on a humidity probe, and moisture tolerant epoxy primers are formulated to accept higher readings. Treat those ranges as typical, not as a rule, and confirm the number against the printed data sheet for the exact product.
| Slab reading | What it usually means | Typical next step |
|---|---|---|
| Below the standard system limit | Slab is ready for a standard system | Proceed with prep and coat |
| Above standard, below the tolerant primer limit | Slab needs a moisture tolerant primer | Add a mitigation primer |
| Above every product limit | Moisture source is too active to coat over | Find and fix the source, retest |
Retesting matters. A slab can pass in the dry months and fail after irrigation or a storm, so a reading is a record of one moment, and a fresh test is reasonable if time passes between testing and coating. Cure also plays a part once the work starts, and our guide on epoxy floor cure time and return to service explains the schedule that follows a passing test.
Ask for the report, not just a verbal pass. A proper test record lists the method, the number of test points, where each one sits on the slab, the date and the slab and air temperature at the time of reading, and the result at each point in the correct units. Keep a copy with the signed quote, because a warranty claim on a coating that failed over a slab with no record of testing is much harder to resolve than one with the numbers on file. The same record also shows the installer which part of the slab is wettest, so the mitigation primer can be specified for that area instead of guessed.
5. Which Phoenix Slabs Most Often Fail a Moisture Test
Phoenix has a dry climate, but a dry climate does not guarantee a dry slab. Moisture in a Phoenix garage floor comes from the ground and from what is applied to the site, and several slab types raise the risk.
- New slabs: fresh concrete releases its mix water for months, and coating too early is a common cause of early failure. A new slab often needs the schedule moved, not a different product.
- Slabs beside irrigation or a pool: garages next to planted beds, drip lines or a pool deck can show higher readings near those walls, even when the rest of the floor is dry.
- Slabs without a vapor retarder: older slabs were often poured with no vapor retarder under them, so ground moisture has a direct path up.
- Slabs in caliche soil: hardpan layers hold water and send it sideways, which our basement epoxy and vapor barrier guide for caliche soil explains for below-grade spaces.
- Slabs after a monsoon season: heavy storm runoff against a garage apron can raise readings for weeks.
None of these is a reason to skip the coating. They are reasons to test at the right spots, and to read the result before choosing the system. Prep steps such as cleaning, repairing cracks and grinding also come first, and our guide on how to prepare a garage for epoxy in Phoenix covers what you can do before the crew arrives.
6. Moisture Mitigation: What It Is and What It Adds to the Job
Moisture mitigation is a primer system, essentially an epoxy vapor barrier, applied to the prepared slab before the coating system. It is formulated to hold back vapor at a rate higher than a standard primer can, and it is applied by squeegee and roller at a controlled thickness.
It adds material, labor and usually one more day to the schedule, because the primer has to cure before the next coat, and it costs far less than replacing a floor that has blistered off. The quote should list it as its own line, with the product name and the reading it is rated for, so you can compare bids on the same basis.
The sequence on site is predictable. The crew grinds the slab to open the surface, vacuums the dust, repairs cracks and joints, then rolls on the mitigation primer and lets it cure to the data sheet window. Only after that does the base coat, flake and topcoat go down. Because each layer has a recoat window, the schedule runs back to back instead of leaving a primed slab open for days, and that is where an installer who has done it before saves you time and risk.
Mitigation is not a cure for a slab with an active leak. If a broken irrigation line or a drainage problem is feeding the slab, the source has to be fixed first, and the slab retested. A contractor who proposes coating without a test, or who gives a verbal assurance in place of a number, is skipping the step this entire guide is about.
7. Frequently Asked Questions
Get a Free Quote With Moisture Testing Included
Ask us to test your slab before you commit, and we will tell you which system fits the reading.